

BretBeermann
-
Postów
494 -
Dołączył
-
Ostatnia wizyta
Typ zawartości
Nowości
Receptury medalowe
Profile
Forum
Galeria
Pliki
Blogi
Wydarzenia
Sklep
Collections
Giełda
Mapa piwowarów
Treść opublikowana przez BretBeermann
-
Z albumu: Beermann's
-
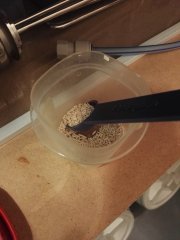
Przechowywanie brzeczki do starterów
-
In the U.S., wort is often "canned" for safe storage to be used for yeast starters without having to heat and cool a wort using expensive and difficult to store DME. We tend to use mason jars, a common item similar to the Weck-style jars in Europe. In order to inhibit botulism toxin formation, pressure and heat must be used to destroy any spores. Without a pressure cooker/canner it is impossible to know your wort is safe. Although the risks are low, it is worth investing the small amount in reasonable equipment to protect one's life. Here in Poland, borosilicate lab jars are affordable (labglas.pl has good prices). These jars are autoclavable, allowing them to be sterilized in pressurized cookers. They act as a great substitute for mason jars, and do not have metal components which can oxidize. My 12-liter pressure cooker can fit 7 x 500 mL Labglas.pl autoclavable bottles without issue. I adapted a perforated flat false bottom for use in the cooker, keeping the jars off the bottom. The bottom of the cooker is filled with water to create the humidity necessary to sterilize. When making a typical batch with wort suitable for starters, mashing more grain and using some of the runnings for this purpose is ideal. Starter wort should be between 7-10 BLG for optimal yeast propogation. Small mashes on the side can be a quick project for producing starter wort as well. In my setup, I am capable of running the pressure cooker next to my boil kettle, doing both at once. Pre-boiling the starter wort helps drop out proteins in the hot break, but is not necessary. If you use the wort directly from the mash, it will have more sediment. With these bottles and their neck (unlike Mason jars) it is easy to keep most of the sediment in the bottle when pouring into your flask or other starter container. I use a funnel to fill the bottles. If you fill them to the top, they will boil over during pressure cooking. Even at these kinds of levels, you will lose some wort in some cases. If you attempt to depressurize the cooker before it has cooled down completely, the change in pressure will cause them to boil over more than usual. It is best to make a batch matching the size of your pressure cooker, and let it sit overnight. The lids should be placed on and turned partially so that they are not fully sealed, but stay on the bottle. Once they are cool, open the cooker and tighten down the lids. Wash the jars off and store them. I open 2-3 and dump them into a sanitized flask and pitch the yeast directly.
-
https://byo.com/mead/item/530-dampfbier-style-profile
-

21.10.2017 - Gliwicki Maraton Warzenia Jopejskiego
BretBeermann odpowiedział(a) na alechanted temat w śląskie
Cały dzien gotujesz? -
Z albumu: Beermann's
-
Z albumu: Beermann's
-
Z albumu: Beermann's
-
Jak masz mnie kolegów, keg 2.5 chodzi do plecaku bez problemów. Mozesz kupic plecak termiczny. Kupiłem adapter i InterTap i uzywałem na balkonie u kolegi bez problemów:
-
Nowa wersja piwo.org - sugestie, problemy, błędy
BretBeermann odpowiedział(a) na elroy temat w www.piwo.org
Seems some people I link threads to are getting DNS errors, others not. For me they loaded in Chrome, Firefox, but not Edge. -
Kegowanie małych warek (10-11l) w corneliusie 18l
BretBeermann odpowiedział(a) na John Petrucci temat w Wsparcie piwowarskie
Troche wiecej CO2, ale nie za dużo. Mozesz nagazowac z cukrem a na koncu nie bedzie wiecej CO2 niz cała warkę. Też masz troche problem z O2. Wiecej CO2 uzywasz że keg jest pusty przed rozlewania. Jak uzywasz cukier do refermentacji, bedzie uzywac troszeczka tlen. Do IPA jest najgorszy problem. -
Nowa wersja piwo.org - sugestie, problemy, błędy
BretBeermann odpowiedział(a) na elroy temat w www.piwo.org
The text editor seems a little lest robust. One issue is getting the formatting of your text to match the formatting of the rest of the text based on what came over from the previous version. Is it possible to add a format painter? I also noticed that many of my posts had messed up spacing and I had to spend 5-10 minutes going through and redoing it in my brewery thread. It took two edits for the spacing to stick. -
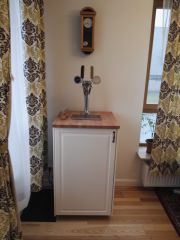
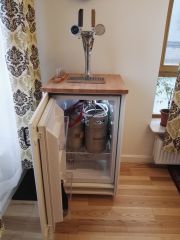
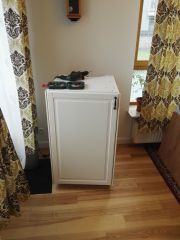
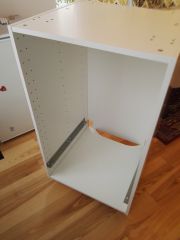
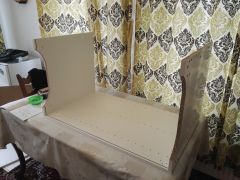
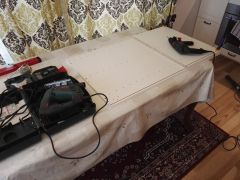
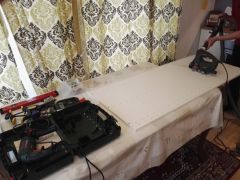
I finally finished my kegerator project today. It took me a while to get to it with everything else I've had to deal with over the last year since I moved. I had it functional until the spring, when I finally disassembled it before I went on vacation. I picked up the last pieces when I got back and got around to building it today. I used an AMICA 16162 inbuilt fridge. I bought a pair of 2.5 gallon Torpedo Slimline kegs which fit with a normal 6 kg tank without any modifications. Using 2 AEB 2.5 gallon kegs won't let you close the door. Using one AEB and one Slimline just fits but doesn't allow you to use the door shelving. My first issue was with the cabinet. I originally meant to put it in a standard kitchen cabinet with undercounter fridge from IKEA to match the kitchen. Turns out, that fridges not from IKEA won't quite fit. I abandoned that idea, and decided I'd have to cut down a 140 cm fridge to 100 cm to fit the fridge. Then I was able to use a 100 cm Bodbyn front to match my new kitchen. My second issue was with the shanks, as mentioned before. To move to InterTap faucets on a Cobra tower required me to get US shanks, which are not made to match the recess of a Cobra tower. I ended up getting help from a friend on the forums to lathe them out to match the tower. After that, I was able to install two InterTap flow control faucets without issue. They work great. My third issue was with the IKEA installers. They wouldn't assemble it for me since I wouldn't let them attach it to the wall. They worried about it falling over (which isn't a concern based on dimensions). So I had to borrow some tools from a friend to cut the cabinet down to size. My last issue was with the door on the cabinet. Unfortunately, the bracket for the fridge interfered with the bottom hinge. I bent the top wing up on the hinge and ended up only installing it on one screw into the cabinet. The other two hinges should give it enough support anyways. I had to use a jigsaw as it was the only thing available. It worked well enough, and made an especially nice cut on the masking panels. I lined up the piece I had cut off and drilled through it to match the pattern for the bottom which was missing. The top and bottom went on without an issue. I installed the metal brackets a bit too high at first, and had to lower them one more placement. It left just a small space below the fridge for storage. I will probably put my large cutting board there. I assembled the door and put the masking panels on before installing the fridge. After using a spade bit to make a hole to fit the tower and counter, I was able to assemble it. The door was pretty simple to attach to the cabinet front, and I was able to hook up two kegs without issue. One last upgrade I made before being finished was to install some 90 degree John Guest fittings so that my beer line came out horizontal and was less prone to leaking from being pushed to the side.
-
Z albumu: Beermann's
-
Z albumu: Beermann's
-
Z albumu: Beermann's
-
Z albumu: Beermann's
-
Z albumu: Beermann's
-
Z albumu: Beermann's
-
Z albumu: Beermann's
-
If you folded one rope in half and burned it, then stopped the burning when one reached the end, and continued folding it every time one half is burnt to the end, you would eventually reach 30 minutes. You can do this while burning the other rope, then apply the same technique for the next 15 minutes.
-
The main issue with the tap was that I would need to get a different piece of tubing and put a worm clamp over it to keep it on the tap. I'm a bit short on swivel nut barbs right now for the correct tubing so that is my limiting factor. Otherwise, I saw pillowing in the fermentor lid but no issues with the transfer aside from dripping due to poor seal between tubing and spigot. I lost maybe 100 mL in the whole transfer, which wasn't bad considering it was rigged up using what I had on hand and it was my first run-through. Should have no issues next time I want to use my bucket fermentor. I don't use it often since I normally brew smaller batches into a keg and closed transfer out of a fermentation keg is a simple matter.
-
Regulamin: nie mozesz pisać po Angielsku na czacie. Kur...
-
Sklepy z surowcami w Belgii/Holandii
BretBeermann odpowiedział(a) na Gaspode temat w Piaskownica piwowarska
https://www.brouwland.com w sklepie a nie przez internet? -
Have you tried it? Plenty of people have and do not agree with you. My 8 Plato 100% peated lager was fermented warmer than that on 34/70. No big issues.

